Games and Interactive Development

Living Coasts 2D Platform Game

Below you can see the 2D Platform game that I have built as part of our Living Coasts project. Also you can see the method in which I used to build the game in Unreal Engine 4.7.6.


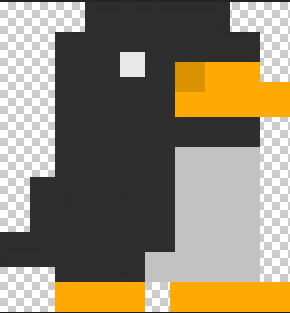
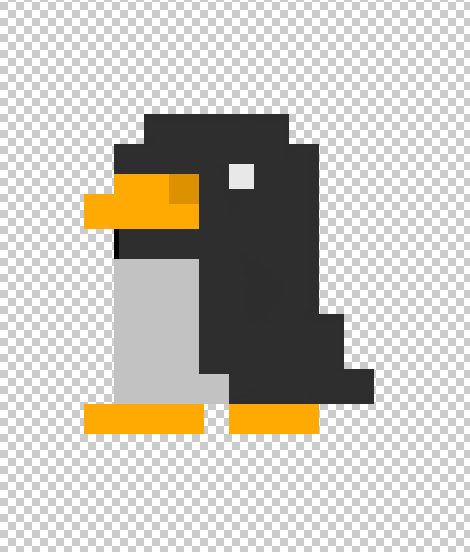
  • The first thing that I did, before even opening up the Unreal Engine, was to make a character in Adobe Photoshop. To do this I used an art style commonly referred to as Pixel Art, a form or digital art that uses large pixels to show a blocky character. My penguin character is shown in the below image:

My Penguin

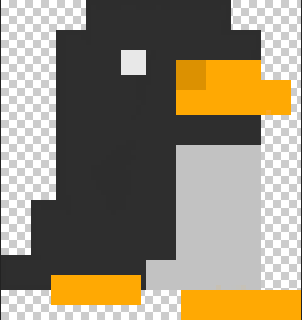
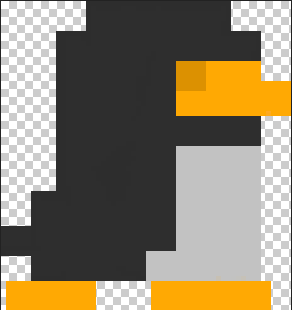
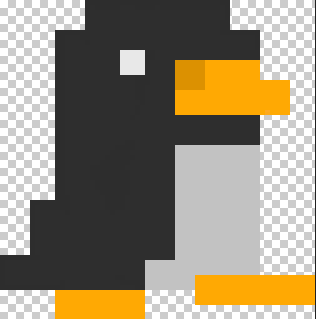
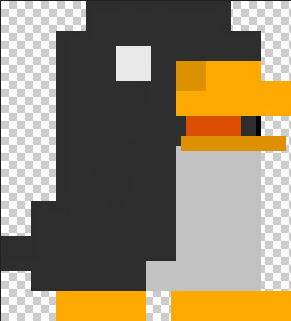
However, when playing the actual game, this would just be a static sprite, with no animation, so I needed to draw out some separate poses that my character would make and then compile them into a flipbook once I reached Unreal. Below are the other poses that I drew out for my character in Photoshop again:

Screen Shot 2015-06-04 at 11.59.14 Screen Shot 2015-06-04 at 11.59.05 Screen Shot 2015-06-04 at 11.58.54 Screen Shot 2015-06-04 at 11.58.44 Screen Shot 2015-06-04 at 11.58.31


Because I decided, due to the tight time contraints, to make a 2D character and game, that meant I didn’t need to UV Texture any models, nor did I need to worry about render or export times, and instead could import my different frames into Unreal directly.


  • The next step to making my 2D side scrolling platformer was to open up the Unreal editor, along with its built in Starter Content, in order to give me a small head-start when it comes to building the Blueprints, as shown below:

New Platformer


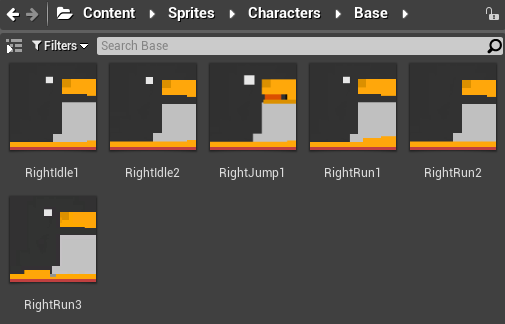
  • I then imported all of the above images of my Penguin character as textures, all with an Alpha channel so I can have just the character visible, and without the white box around it. Below you can see all of the textures that I imported into Unreal:

Texture Files

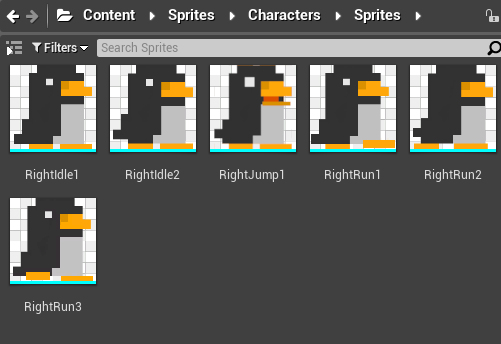
  • Once the different textures had been imported I created sprites for them all to fit, this way they would become solid objects in the 2D space, as opposed to just textures, which nothing would interact with and cannot be controlled like a sprite can be. The Sprites:

Sprites Files

  • Once these textures were all individual sprites, I create two separate Flipbooks. This allowed me to place the different sprites in an order and animate them, giving the illusion of movement. One of my flipbooks, the one that will be played when the character is moving, is displayed below:

Run Flipbook

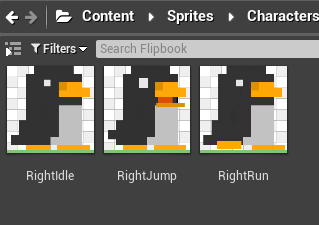
As you can see above, in the centre is displayed which image is currently being shown, along the bottom there is a timeline where the number of seconds it takes to play the short animation is shown. Just above the timeline, where the three white box shapes are displayed, is another version of the same timeline, however this one displays which image is being played, and which image is next etc. Below you can find my 3 different flipbooks in my file system:

Flipbook FIles


  • Once I had created, compiled, and saved all of my flipbooks I began working on the blueprints for the character. To do this I had to replace the default sprite that Unreal had in there as part of the starter content, with my own Penguin Idle Animation sprite. Next was just resizing the sprite and making sure it was level with the ground.

Screen Shot 2015-06-04 at 12.45.39

The arrow on the penguin is the direction that the character will be facing when it spawns, and the tablet shaped wireframe around the character is the collision area, so the feet of the sprite are touching the bottom of the collision area making it appear as if the character is placed on the solid ground, whereas in fact its the collision area that is touching the ground. The wireframe collision zone cannot be seen when playing, only in the blueprints as a reference.


Below I have shown you the different flow diagrams that I have made for my character. Each one has its own purpose and does something that makes the game flow correctly and the character interact with all the things it needs to.

This flow diagram shows how the character will handle animation. The first red box shows the title ‘Update Animation’ – this is a command. When prompted it will cast to the ‘Set Flipbook’ command, which has to decide whether the is ‘False’ or ‘True’. When the character is false it plays the ‘Idle’ animation, because False represents the character when its not in motion. When the character is ‘True’ it will play the ‘Run’ animation, because True represents the character when it is in motion.

Screen Shot 2015-06-04 at 12.46.00


The below diagram shows how the character will deal with movement. When the player inputs the ‘Right’ command (because it is a 2D side scroller it can only move right at the beginning, then left, which will refer to the same piece of code but in reverse), it will move the character to the right by a certain set velocity. It will also call upon the ‘Update Animation’ command and so then the movement animation will play because the character is now ‘True’ or moving.

Screen Shot 2015-06-04 at 12.46.19


The command below is probably the most simple out of all of them. It reads that when the jump key is pressed, that the character should jump, and when released it should stop jumping. Its as simple as that.


Screen Shot 2015-06-04 at 12.46.25


The two images below are both part of the same flow diagram, but it too big to fit into one screenshot so I had to split it into two – the white line that exits the first image at the bottom of the screen connects directly to the ‘Delay’ box in the second shot.

In the first shot, the ‘Event Begin Play’ box at the very beginning tells the game that this should be played from the start of the game, when it is first loaded up. Then, the next two boxes refer to my counter, (which we will discuss a bit later), and then I have implemented code to allow my character to respawn when it falls off the platforms. It basically tells the game to, when the player is killed, to get another character and place it at the beginning of the game, with 0 delay, and allow the player to continue playing.

Screen Shot 2015-06-04 at 12.47.14

Screen Shot 2015-06-04 at 12.47.22


  • Once I had my character set up completely I began working on the layout of the 2D Platforms, building a challenging yet fun, linear style, platform race, with coins to collect along the way. The completed course looked like this:

Screen Shot 2015-06-04 at 15.21.17

Down in the lower left hand corner you can see a small flag and an arrow: this is where the character will spawn at the beginning of the game, and then respawn when it falls off the platforms. Along the route I have placed ‘rings’ that are illuminated slightly and rotate on the spot. Once the character bumps into these rings a short audio cue will sound, and the ring will disappear. The audio indicates to the player that they have collected this coin – and is shown in the top left corner via a simple counter.

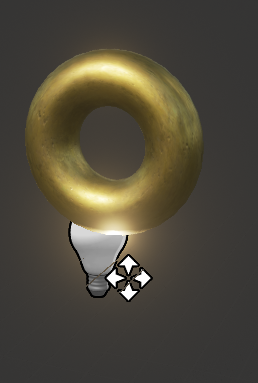
For my coins I made a basic Torus in an ‘Actor’ Blueprint, and added a golden texture to them to give them a ring type look. I then also added a light to the bottom of each ring, in order to give them more of a shine and made it so that they will rotate on the spot. Below you can see all the things required for my rings:


Screen Shot 2015-06-04 at 15.21.47

Screen Shot 2015-06-04 at 16.37.37

As you can see in the code above, I have it tell the game that this object can can be interacted with by the player, in that the character will be able to pass through it as though it wasnt there. Also, I have set it so that when the player touches it, it will be destroyed, and an audio cue will sound along with an increase of 1 on the counter. This tells the player that they have picked up the coin.

  • Test!

The next thing I did was to quickly test the game, now that the layout and character were both complete. Before this I had obviously been testing it through every step, but this was the first test I made when everything was complete, testing every aspect of the game as I went.

Screen Shot 2015-06-04 at 16.36.53


  • After I had tested the game and fixed any and all bugs that I found I began work on two things: a menu at the beginning of the game, and an ending title screen.

Screen Shot 2015-06-05 at 09.37.52

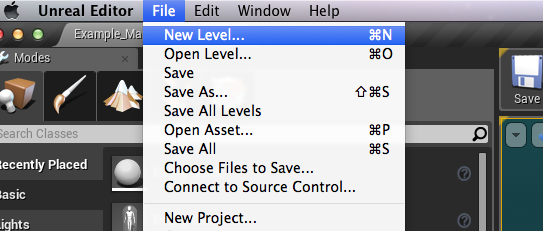
The first thing I needed to do was to create a new level, this would be within the same project file that the main game is in, its just as a separate level. I opened up a new and empty project file and, down in the project menu, I clicked ‘new Widget Blueprint’. This would create a new blueprint that would display a screen over the original level.

Using this I created a very simple menu system, with a plain white background:

Screen Shot 2015-06-05 at 09.39.05

Using the same flow diagram system as shown for some other aspects of my game I made the buttons take you to their respective places – the ‘Quit Game’ button will close the game entirely, and the ‘Play Game’ button will take you to the main level. You can see this below:

Screen Shot 2015-06-05 at 09.39.13

Now that all of the buttons were set up I needed to make it appear on this level. To do this I went into the empty blueprint for the level and made the following flow chart:

Screen Shot 2015-06-05 at 09.38.42

This tells the game that, when this level is played, to create the menu widget, add it to the screen, and show the mouse so you can click either button. In the main game this code is the same, however it makes sure the menu is removed from the viewport and that the mouse disappears instead.

Once I had finished creating each of these different splash screens (the ending one is the same, however it says ‘congratulations’ and it displays when you reach a certain location) my level file system looked like this:

Screen Shot 2015-06-05 at 09.38.09


Bugs and Problems

I encountered very few problems when making my game, due to the fact that I managed to find some very good tutorials online, and thanks to the help of my tutors, who managed to help me with any and all of the problems I encountered.

One of the main problems I did encounter was, due to the fact that the tutorial I was watching was made in an earlier version of the Unreal engine, I did not have some of the flow commands that they used. This proved difficult for me as I had to work out how to divert past this problem and try to avoid it all together. Eventually though I managed to find a simple and easy way to bypass it, only using one extra command, and all of it worked perfectly as though I had used their code.

One problem that I have not managed to solve was the problem that my character did not have a jump animation. Or rather, he did have a jump animation, however, I could not figure out how to make it so the game would play this animation when it jumped. In one of the previous sections of this post, I said how that when the character was ‘True’ it would play one animation, and when ‘False’ it would play another. Due to this binary system of playing animation, there was no third state, so effectively there was no jump, only in the ‘Jump’ command, the character treated it as just moving. After I spent a good 2hrs online looking through many different tutorials and after talking to my tutor about it extensively, we didn’t manage to come up with a solution to this problem, and both decided that it was better to focus my attention elsewhere.


Evaluation

This is my critical evaluation for the Living Coasts Game Project that we had to make.

Process:

Originally I had planned to make a 3D Open World game, where your character, an animal from the park that would be hidden from you, would go around the park and talk to animals to find clues as to which animal you were and what home you belong in – the cliffs, the ocean, the coast etc etc. To do this, I planned on making all of my assets using techniques that I have picked up over the past 3 years, in Cinema 4D, as I was most familiar with that program. I would also make my characters using a piece of free software called Sculptris, where you can model like you would with clay, and sculpt out a penguin and other animals that can be found on the Living Coasts site. I would have taken all of my textures straight from Living Coasts, after we took a short trip there to take some reference images for our ideas generation, I thought that, to make it look even more like the park, that I would take pictures of the cliffs and grasses and get my textures first hand.

However, due to the time constraints put onto this project, this was not possible, and so instead I decided to make a smaller 2D platform game, with cartoony graphics. I used my Adobe Photoshop skills, as well as the software, and my graphics tablet to draw a pixel character and some pixel styled platforms for my character to jump across on. This was a whole new style to me and I found it fun and a new challenge. I think that both assets – the platforms and the character – both turned out really well and I may considered furthering my development of these skills and this artistic style. Once these assets were made, I brought them into Unreal and then used some new skills which I picked up from online tutorials and my tutors.

Problems:

As outlined above, i did not have many difficulties when making this project, due to the good tutorials that I followed and the help from my tutors. However, there was one major issue that I found that I have yet to resolve. The problem that my character did not have a jump animation. Or rather, he did have a jump animation, however, I could not figure out how to make it so the game would play this animation when it jumped. In one of the previous sections of this post, I said how that when the character was ‘True’ it would play one animation, and when ‘False’ it would play another. Due to this binary system of playing animation, there was no third state, so effectively there was no jump, only in the ‘Jump’ command, the character treated it as just moving. After I spent a good 2hrs online looking through many different tutorials and after talking to my tutor about it extensively, we didn’t manage to come up with a solution to this problem, and both decided that it was better to focus my attention elsewhere.

This problem may have a chance at being solved over the summer, as I will not be constrained by the tight time constraints that the course has come with.

Improvements:

One major improvement that I would like to make to my project is the addition of more sound effects and some ambient music for the background. This could come with sounds such as footsteps, some penguin noises, a clap or crowd cheer for the congratulations screen at the end, and maybe even some background ambiance as well as the music.

Conclusion:

In conclusion I believe that my project was a success, despite the lack of music or sounds, or the jump animation. I believe this because, despite all these factors, it is a fully functioning game – with a character, a goal, collectables, a beginning middle and end, and some short sound bites. With some small refinements to the game, and some better animations of the menus, I believe this could be a game that kids visiting Living Coasts could all enjoy for hours on end.

Standard
Developing Research and Practice

Contextual Research

For one piece of my work to be successful, the interactive comic idea, I needed to do some more research into how to use Adobe Photoshop effectively, and to expand my knowledge on the different tools that are at my disposal. To do this I went online and looked up many different tutorials on how to use the ‘Pen’ tool and some other tutorials on how to make mist and other different phenomenon.


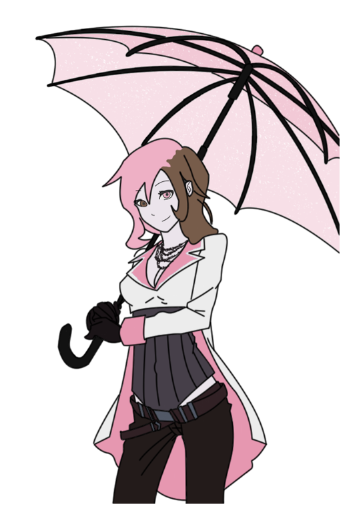
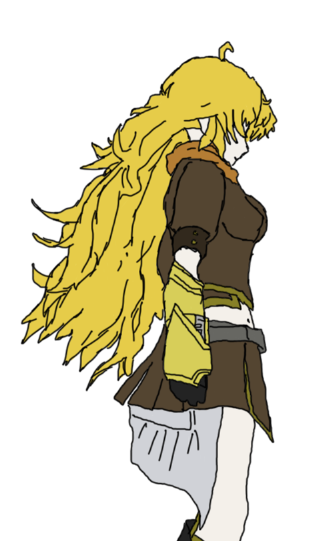
The first tutorial was about how to use the ‘Pen’ tool to trace a pre-existing image in order to smoothen out the lines and to add smaller, finer details. The tutorial was effective on helping to broaden my understanding of the ‘Pen’ tool and help me to successfully and confidently use it in my work and now in any future works I have planned. It was helpful because it took the steps slowly, and was clearly narrated by a confident professional who obviously catered to my learning style. As you can see from the image of the girl in pink, white, and brown, the lines are smooth and precise and the colour is neatly filled into the edges of the drawing without any overlap or mistakes. However, the second image, the blonde standing facing the side, the lines are more scribbled and look rushed due to the nature of the drawing hand and the way the Wacom tablet interacts with the pen. I believe the white, pink, and brown girl is evidence that this tutorial helped me because she successfully shows how I have put these skills into practice and have completed piece of work to a much higher, and more professional, standard.

Screen Shot 2015-05-14 at 10.52.59Screen Shot 2015-05-14 at 10.56.59


To conclude, I believe this contextual research has, evidenced by the images above, helped me to become a better artist overall, and has helped to expand my understanding of the software I will be using once I enter the professional industry.

Standard
Developing Research and Practice

Theoretical Perspectives

A theory that I needed to research for one of my projects this year was the theory that technology drives history – also known as Technological Determinism, which many different philosophers and academic professionals have discussed this theory many times throughout history.


To complete my essay on whether this theory was correct I looked specifically at technological advances and disasters from the past one hundred years or so. I specifically looked at the advancement of the nuclear reactor, the development of satellite technology and the evolution of the World Wide Web. After I researched these specific technologies, and the tragedies that occurred because of them, weighing up all the evidence in favor and against, I came to the conclusion that it was, indeed, correct.


I believe this could help me with my work because as technology such as computers and their accompanying software evolve and change, with the new outlook I have thanks to this theory and the evidence that I researched, I may be able to predict where it is going and the effects that it will have on todays and future society. This could help me to specifically target areas of society with my work and help to promote and even acquire more contracts if I go freelance, thus helping me to achieve my long terms goals as outlined in my PDP.

Does Technology Drive History

Bibliography

Standard
Developing Research and Practice

Individual Work Example

One example of when I have worked well individually could be when I was working on my interactive comic for the Digital Skills module. For this I needed to develop my skills as an artist and learn how to use Adobe Photoshop effectively, as well as plan out a plotline and characters for my work of fiction. This could not have been achieved when working as a team or in a group due to the skills that needed to be learned then put into practice on work that was our own. If I was working in a group for this piece I believe that it would have been more of a hindrance than any help because the skills require thought and concentration, and if other people are distracting me I wouldn’t have been able to achieve the level of precision that I have completed on my work. The aforementioned skills include working with layers and the opacity function to blend the layers to achieve more effects on your drawings, the pen function – to trace an image and get smooth lines instead of the wobbly hands that people get sometimes when drawing, and to use ‘Blending Styles’ on the individual layers to achieve effects such as a light mist around certain characters, or, in other pieces of work, to make star fields and other other-worldly phenomenon. I believe I succeeded in working independently here because I was able to learn from online tutorials well by applying the processes they were talking about as I went, pausing and playing the videos again once I have done the step that they just showed me. In a group this would not work because other people may be having more difficulty with it and so would take longer and I would not be able to continue until they finish.

Comic 1

Standard
Developing Research and Practice

Personal Development Plan

Where am I now?

I feel as though I am capable at using softwares such as Adobe Photoshop, Cinema 4D and other creative programs. I am good at making works of art through different means like drawing and 3D modelling. Using these skills I have made it into my Foundation Degree at South Devon College’s University centre. Here, I am learning new skills for my work and improving the skills I already have. I also work on these skills in my spare time, working up a fairly robust portfolio of my work.

Where do I want to be?

For the next couple of years I plan to continue my education in this sector, eventually working towards getting a job in this line of work – either going freelance to seeking out a more permanent spot on a development team.


Short Term Goals

My short term objectives are to gain the necessary skills to become better at the work I want to make, and to hopefully begin work on a portfolio of my own work.

Start Date: 1st May

End Date: 1st July

Evidenced by – significant improvement in quality of work / several pieces of work in my digital portfolio

Medium Term Goals

My medium term objective is to successfully graduate from university, and complete my course officially at the end of three years.

Start Date: 1st September 2014

End Date: 30th July 2017

Evidenced by – graduation certificate

Long Term Goals

My long term objectives are to get a job in the creative media industry, whether that will be as a freelancer working with familiar technology and in the area I am best at, or to find a job in a more permanent development team.

Start Date: 1st September 2014

End Date: N/A

Evidenced by – a job in the area that I want to go into / a steady supply of income

Standard
Developing Research and Practice

My Three Most Successful Projects

For our Digital Skills unit we had to create 3 different, independent digital artefacts. These, for me, turned out very successfully, and so I have used them as examples in this piece of work.


  • One of the successful projects I have created this year has been the creation of a short, 1 A4 page comic. To make this comic I used my artistic skills that I have been learning in my spare time, and a wide variety of Photoshop techniques that I have both learned in lectures and through my own research. To come up with this concept I thought about ideas for our Digital Skills unit, where we needed to create some Digital Artefacts. I love fiction, so the obvious answer was to make a short interactive comic. However, due to the time constraints I wasn’t able to make it interactive, but instead to just have it as a stand-alone comic page.

Comic 1


  • Another successful project was the creation of a 3D modelled Colony Starship, using the 3D modelling software Cinema 4D. I, again, used many of the skills that I have built up over the past few years, as well as some skills that we have been taught during our lectures. I believe it was successful because I was happy with the design of the final product, because I followed a rough sketch I drew out during the planning stage, and because of the feedback I received, people thought that it looked like what I was trying to design in the first place.

https://www.dropbox.com/s/23i2f3b4vluhdgz/Space%20Ship%201a.c4d?dl=0


  • The third and final successful project I have created this year is an image of a planet with a background of a star field and a sun blazing through the atmosphere. Once again, to achieve this I used my own Photoshop skills that I have developed over the past few years, and some skills that I picked up during my time at the University. I believe this project to be a success because I am happy with the outcome, as it followed the brief and it looked like my rough design I prepared beforehand.

Planet 1

Standard
Developing Research and Practice

Honey & Mumford Learning Styles Questionnaire

1

2

3


45A Honey & Mumford Questionnaire is a way to measure what type of learner you are, whether you are a Pragmatic learner, Reflector, Activist, or a Theorist type of learner. As you can tell by the questionnaire above, I am a Reflector kind of leaner as indicated by the number of ticks to the questions of that category. This shows me that I tend to learn best when I stand back and observe things, rather than jumping in and getting my hands dirty. I like to get feedback from others to help improve my work, and I tend to look at the problem from many different perspectives. The lowest score on the board is a ‘5’, which is in the Pragmatist section. This shows that out of all the categories I am less of a pragmatist learner than the others, not looking at the big picture and the future, but focusing more on the now and how the techniques and lessons can be applied to my work now. I believe this to be a fairly accurate description of my general learning style – as I tend to focus more on the present project, and less about the future projects and how I would apply my skills in a workplace environment.


Standard
Digital Skills

Photoshop Space Scene – Digital Artefact

For one of my digital artefacts I decided to create some sort of space scene, as I enjoy making sci fi type artefacts and I wanted to try something new.

To achieve this I spent many hours looking up different tutorials on how to make anything space using Adobe Photoshop CS6, and looking up different examples of space scenes so that I could get some inspiration for my own work.

In the end I ended up finding this fantastic tutorial on how to create your own realistic looking planet: http://dinyctis.deviantart.com/art/Planet-Tutorial-3131869

Below is my step by step method for creating my very own planet space scene.

Proposal Document


Firstly, I went onto Google Images and found a royalty free texture of a rock surface:

Rock Texture


Next I added an effect that Photoshop calls ‘Spherize’ which adds an effect that gives the image a spherical look to it. For example:

Spherized

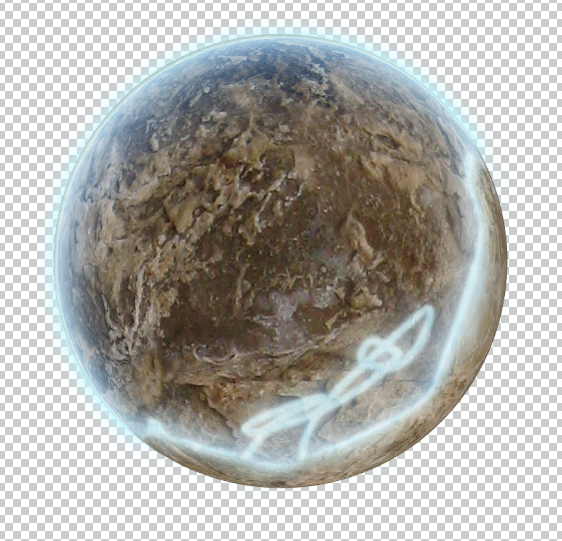
As you can see it has made the flat retangular image into a perfectly spherical rock, which can be made to look more planet like. The first step to do this is to add an ‘atmosphere’ layer with the following effects: Inner Shadow, Inner Glow, Outer Glow. This will give you this effect on the rock sphere:

Atmosphere Layer

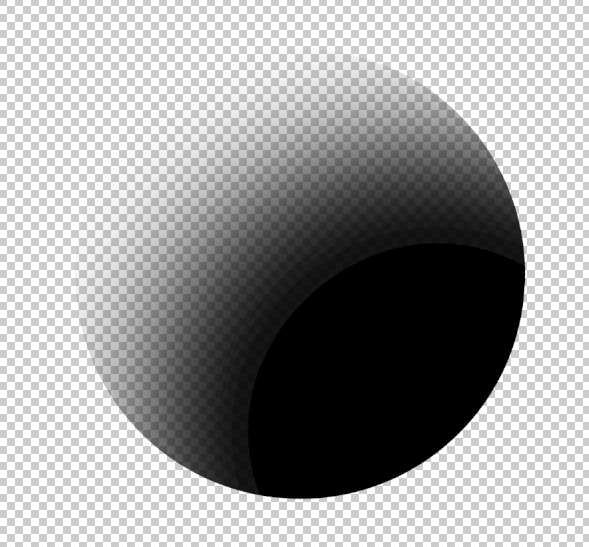
The scribbled lines at the base of the planet wont be seen, so don’t worry about it looking messy at this point. As you can see its added a thin blue line around the top of the sphere, which adds an atmospheric look to it, and a slight glow to it, suggesting theres a star nearby. Now, we need to darken the lower half of the planet, and this will help to hide the messy scribble at the bottom. To do this we make a new layer and make a sphere in the same shape as the planet, and fill it with a semi transparent gradient. One half will be solid black, and will fade out to transparent. This is the effect you create:

Shadow Gradient

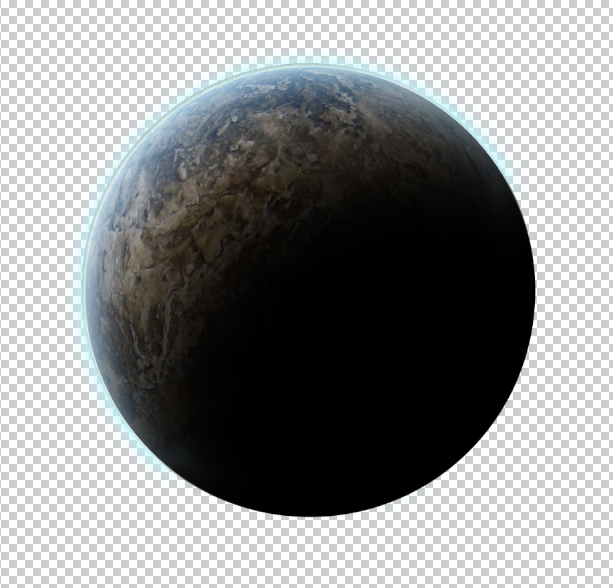
And then put it over the planet and atmosphere to get:

Planet

As you can see, it adds a darkside to the planet and makes it look more like a planet. Also, the atmosphere has also added some blue to the top half of the planet and made it look like there is an ocean, which is an accidental side effect that has enhanced my image greatly.

There is something missing from the planet however – a setting:

Star Feild


I added a star field to the background, using a screened ‘Clouds’ layer placed over a ‘Gaussian Blur’ layer, then I messed with the levels and brightness etc to get the effect I desired. However, I still felt like it was missing something:

Planet 1

The last thing I added was a ‘Lens Flare’ behind the planet on the brighter side, so that it looks like there is a star behind the planet, and almost adds the planet to a setting of life and realism. Due to time constraints again, I was not able to add anything to the scene, however, I personally feel that the scene is almost complete in its current state – the star field in the background could use some work, and the scene could use some starships or something added to the foreground, but as it stands it is a pretty nice looking planet.

The file: https://www.dropbox.com/s/6ll8ovpaz9cw60y/Planet%201.psd?dl=0


Standard
Digital Skills

3D Model – Digital Artefact

Colony Star Ship

For one of my digital artefacts I have chosen to build a 3D model of a Colony Star Ship. To do this I will draw out some basic designs using Photoshop, then use Cinema 4D to construct the ship from blocks places in the world. I will also be using a free plugin called Greebler (Kuroyumes-developmentzone.com, 2015) to add some fine details to the outer hull of the ship. These will be automatically generated, however the main design of the ship and all of the modelling (aside from the Greebler effects) will be modelled by me.


Proposal Document


The Basic Design

Below is a detailed explanation of my design process, showing the development of the idea to the final concept designs in Photoshop.


  • The first thing I did was construct a Mind Map online (Bubbl.us, 2015).

New-Mind-Map_vniu


This helped me to map out all my different ideas I had about what I wanted to make. Then, from there it allowed me to further develop the idea into the colony ship idea I have begun building.


  • The next thing I did was draw out some rough sketches in Photoshop.

I made multiple sketches from different angles of the ship to give me a 3D idea of what it might look like and how I would go about making it. For example, the image below shows an early sketch of from one side of the vessel. The ship took a lot of inspiration from the famous Battlestar Galactica, (Battlestar Galactica, 2004), and so I had to rethink a lot of the hull design for the ship.

Design 1

The ‘Battlestar Galactica’ type design I came up with. However, because of copyright reasons I had to change it.

The new design of the ship. I decided to go for more of a cargo/colony vessel.

The new design of the ship. I decided to go for more of a cargo/colony vessel.


  • Then I opened Cinema 4D, my 3D modelling software I am using.

Using the basic polygonal modelling techniques, I began to draw out the basic layout of the ship, starting with the long bow.

Screen Shot 2015-04-16 at 10.13.47

The long main hull of the ship. I added a sort of rigid bend to it, and added a strip along the top. At the front I pointed it slightly to give it more of a directional look and feel.

Screen Shot 2015-04-16 at 10.14.19

Next I added the middle section of the hull. I also began to add some small bits of detail to this section – some small indents in the hull along the sides, and two fins at the back which will be covering the main engines.

Screen Shot 2015-04-16 at 10.15.01

I wanted to add a large back section to the main body of the ship, so decided to go for more of a stepped look to it. It has the same main design as the front of the ship but is smaller and and stops more abruptly at the back, as opposed to the more pointed front section.

Screen Shot 2015-04-16 at 10.15.29

Here, I began to add some more details to the ship itself. As you can see, I added a bridge section that I had sit above the middle part of the ship. I also added an ‘undercarriage’ section, where the main active part of the ship is – the living quarters, etc. Then I decided to add a small box at the back of the ship, which for now is just an aesthetic piece.

Screen Shot 2015-04-16 at 10.15.54

In the end I went with a Colony ship design, so added some ‘crates’ under the hull, with the idea that they are modular units needed to build a sustainable colony – building materials, medical supplies, food supplies, power etc. I also added some more details to the underside of the front of the hull.

Screen Shot 2015-04-16 at 10.16.32

In this shot you can see that I added some more aesthetic pieces, including some struts along the top of the main and rear hulls, as wells as a large brace-type structure on the underside of the back. These have no real purpose in mind other than to add detail to my ship, and personally I think they work well with the whole theme I was going with.

Screen Shot 2015-04-16 at 10.16.46

Finally I added the final touches to the modelling – some small ‘comms’ along the ship just to give it that human touch finish.


Unfortunately, due to the type of Cinema 4D Licence the University has, I am not able to install and run the Greebler plug in, and will have to leave the ship as it is, with the extra hull details. Also, due to the tight time constraints I am unable to texture and animate the ship, so will have to complete that process in my own time once the course is over. For now, however, the ship is complete and you can find the file below.


File: https://www.dropbox.com/s/23i2f3b4vluhdgz/Space%20Ship%201a.c4d?dl=0

Standard